
Non Precision Approach Page 3
How do we calculate the distance around the arc given it is not a straight line?
To do this we need to learn the 1 in 60 rule. The 1 in 60 rule says that the width of 1 degree over 60 units is equal to 1 unit.
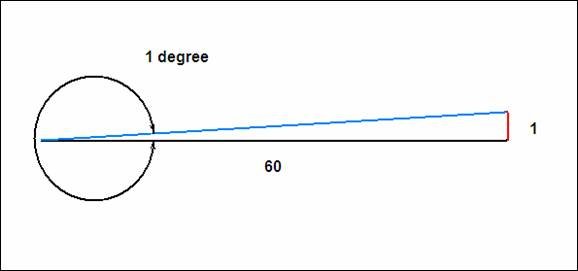
Therefore 1 degree over 60 nm would be 1 nm wide and if we doubled the unit to 120nm it would be 2 nm wide and over 180 miles it would be 3 nm wide. Going the other way at 30nm it would be half a mile and at 10 nm it would be 1/6th of a nm wide.
We know that our arc at NR is 10nm therefore each degree of the arc equates to 1/6th of a nm of arc that we need to travel around.
From Taupo we will join the arc on the 298 radial and descend inbound to Napier on a final approach course of 185 (on the 005 radial). Simple maths tells us we need to traverse 67 degrees around the arc before we reach the inbound approach track.
To calculate this distance around the arc we either multiply by 1/6th or divide by 6 (same thing).
1/6 x 67 = 11 nm approx
The next step is to look at that distance in terms of altitude. Remember we are traveling at 3nm per 1000ft of alt loss (or 6nm un-pressurised). Therefore 11 nm in terms of alt is equal to:
11 /3 = 3.6666x 1000 = 3666 ft (keep the numbers simple so lets call it 4000ft)
We have just calculated that we will descend thru 4000ft as we travel the 67 degrees around the arc.
Taking a look at the approach chart you can see that as we turn inbound onto the final approach course the lowest altitude allowed at 10 nm on final is 2200ft. However when arcing the way we are there is a descent limit of 2700ft between the 345 radial and the inbound course.
Further to that let’s take a look at the bottom section of the approach chart. You will see that in the numbers section there is a distance versus altitude chart for the final approach segment.. According to the chart we should be 10nm at 3200 ft to get a constant descent profile.
Therefore if we add our 4000ft (altitude descending thru around the 67 degrees of arc) to this 3200ft we get 7200ft. This is the altitude that we need to initially join the arc at. Let us call it 7000ft as we rounded the 3666 up to 4000ft earlier.
So we need to be on the arc at 7000ft. This takes care of point 1. Now we need to look at point 2 the DME steps.
The MSA on the route is 6500ft. We have established that we are going to join the arc at 7000ft and that this is higher than the route MSA so the steps are not relevant in this case.
So from our cruising altitude of FL200 we will have 20000 – 7000 =13000 ft to descend before we join the arc.
To covert this to a distance divide by 1000 and multiply by 3.
13000/1000x3= 39nm
So 39 miles before reaching the arc we will start our descent. Of course we have to add the 10 mile radius of the arc in order to get a TOD distance based on the NR VOR/DME.
39 + 10 = 49 nm
All the way down we will check this descent (with mental calculations) to ensure we are on the desired descent path. Passing 16000 ft we should be:
16000-7000=9000/1000x3=27+10 = 37 NR DME.
It can even be checked around the arc by dividing the angular distance to go by 6 to get the remaining nm’s until reaching the inbound course. Use the VOR needle on the RMI to work out the degrees to travel. You don’t have to be too accurate. Ball park figures will do.
Beware that not all arcs are 10nm.
Using the 1 in 60 rule.
The divisors to use are:
| ARC Distance | Divisor |
| 10 | 6 |
| 12 | 5 |
| 15 | 4 |
For the purpose of the exercise let us assume that MSA was 10000ft and a step down at 15nm NR to 6000ft (see fig 6). This means that the aircraft cannot descend below 10000ft until 15nm from NR. This only leaves 5nm to descend the 3000ft to join the arc at 7000ft (should be 9nm). Ideally we would like to be at about 8 or 9000ft at this 15 mile point. This means we will need to descend the aircraft at a higher rate than normal after passing 15nm until we regain the ideal profile again. As the 10000ft limit is a “hard altitude”, and is higher than the profile we worked out previously, we may as well use this limit to calculate the top of descent point.
Therefore 20000 – 10000 = 10000 x 3 = 30nm
Add the 30 to 15 to get our TOD point based on the NR DME
30 + 15 = 45 nm
So because of the step we could start our descent at 45 miles instead of our previously calculated 49 nm.
From a practical point of view I would still descend at 49 nm. This would allow me to reduce the speed approaching the 15nm step and then once past it I would accelerate again in a zoom descent (energy management). The aircraft will have an initially higher descent rate until back on proper descent speed and this will assist in losing that extra 1000 to 1500 ft of height to get back on our ideal arc profile.
Remember the 250 kt below 10,000 ft with 30 nm of an aerodrome speed restriction.
As a general rule enroute DME steps will usually only be limiting if there is a short distance to travel around the arc.